PxPlus Visual Studio Code Extension
The PxPlus Visual Studio Code extension is an extension for Visual Studio Code to enable working with PxPlus programs.
It provides the following functionality:
Create new PxPlus programs
Open and Edit existing PxPlus programs
Work with binary PxPlus programs
Work with text-based PxPlus programs
PxPlus syntax highlighting
PxPlus program error diagnostics
Compiling or Listing of PxPlus programs
Auto Complete based on PxPlus language elements (directives, mnemonics, system functions, system parameters, system variables) and the current document
Compare binary PxPlus programs
View Properties for binary PxPlus programs
See the tutorial How to Set Up PxPlus Visual Studio Code Extension.
(The PxPlus Visual Studio Code extension was added in PxPlus 2024.)
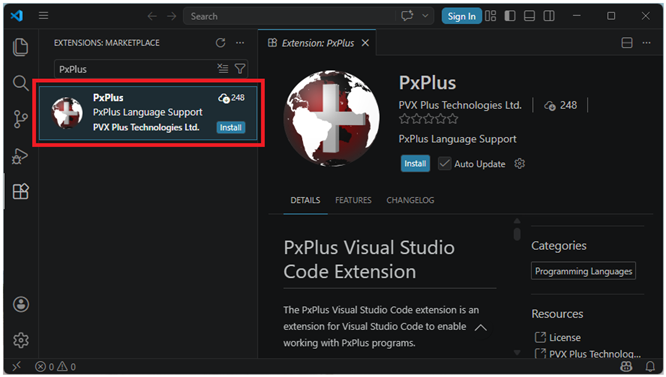
How to Install and Set Up the PxPlus Extension in Visual Studio Code
1. | Download and install Visual Studio Code from the Visual Studio Code website https://code.visualstudio.com/ for your platform (i.e. Windows). If you are new to Visual Studio Code, this website is a great resource to learn more about it. |
2. | On the Activity Bar on the left side of Visual Studio Code, click the Extension icon. This displays the Extensions view and the Extensions Marketplace. |
3. | Find the PxPlus extension by entering PxPlus in the Search Extensions in Marketplace input box. |
4. | In the displayed list, click on PxPlus and then click the Install button to install the PxPlus extension. |
Before you can use the PxPlus Visual Studio Code extension, you must tell the extension where PxPlus or a PxPlus WindX Plug-in is installed:
5. | Open the Visual Studio Code settings. To do this, click the Gear icon in the bottom left corner and select Settings. |
6. | Expand the Extensions node and select PxPlus. |
7. | Under the PxPlus Path sub-heading, enter the path to the directory containing the activated PxPlus or WindX Plug-in, excluding the filename (e.g. C:\PVX Plus Technologies\PxPlus-64 2026 or C:\PVX Plus Technologies\WindX Plugin 2026). |
If you plan to work with text-based PxPlus programs, you must specify which file extensions Visual Studio Code should recognize as text-based PxPlus programs:
8. | Under the Text Program File Extensions sub-heading, add a file extension to the list by clicking the Add Item button. Enter a .xxx file extension and then click OK. To add more than one file extension, repeat this step as many times as needed. By default, the only extension in the list is .pxprg. |
If pointing to a WindX Plug-in, you must also set up the WindX connection:
9. | Under the WindX sub-heading, you can specify what type of WindX connection to use and then provide the WindX server IP address or hostname, the port, and whether the host is using SSL/TLS. |
If using WindX SSH, you must also set up the SSH connection information:
10. | Under the WindX-SSH sub-heading, you can enter the Username and then click Set password to securely save the SSH password. You will also need to specify the full path to the remote PxPlus executable on the WindX SSH host, including the filename (e.g. /home/user/pxplus2026/pxplus). |
If you plan to compile or list PxPlus programs, then you should also specify the output directories and file extensions:
11. | Under the Conversion sub-heading, enter the Compiled Output Directory and/or the Listed Output Directory. You can also optionally specify a file extension to be added to the output file for both compile and list. |
For a description of these and other settings, see PxPlus Extension Settings.
(Support for WindX connections was added in PxPlus 2026.)
Workspace-Specific Settings
If you work on multiple projects, you may want different settings for different projects. For example, for one project, you may want Suppress LET On, and for another project, you want it Off. This can be accomplished with workspace-specific settings, which override global settings.
Click the PxPlus > Edit Workspace Settings menu item from the Explorer right click menu. This will create or open an existing pxpvsc.ini file in the workspace root directory. Within this file, you can uncomment the settings you want to override and specify the value you want to use for this project.
The settings name in the INI file match the settings name without spaces from within the Settings screen. If you hover over the setting in the Settings screen, you can see a tooltip with the name without spaces.
(Support for workspace-specific settings was added in PxPlus 2026.)
How to Use the Extension
Once the extension is set up, you can work with PxPlus programs. You can:
Create new PxPlus programs.
Open and Edit existing PxPlus programs.
Compile or List PxPlus programs.
Use Code Navigation to save time and work more efficiently.
Compare binary programs.
View Properties for binary programs.
Create New PxPlus Programs
To create a new PxPlus program, use one of the following methods:
Click the PxPlus icon in the top right corner of an Edit window and select Create New PxPlus Program.
From the File menu or from the Welcome screen, select New File.
Right click in the Explorer and select PxPlus > Create New PxPlus Program.
A list of possible file types to create will display. From the list, select Create a PxPlus Program.
Use the Save dialog to choose a pathname for your new program.
Open and Edit Existing PxPlus Programs
To start editing PxPlus programs, you first need to add a PxPlus folder to the workspace. This is initiated by using one of the following methods:
Click the PxPlus icon in the top right corner of an Edit window and select Add PxPlus Folder to Workspace.
Click the Open PxPlus Folder button in the Explorer window when no folders are open.
Click the PxPlus > Add PxPlus Folder to Workspace menu item from the Explorer right click menu.
This will allow you to select a PxPlus folder to add to the workspace.
Any PxPlus programs or text-based PxPlus programs that are opened via this workspace will be recognized as a PxPlus program by Visual Studio Code. This enables all the features and allows PxPlus programs to be edited.
Compile or List PxPlus Programs
To compile a text-based PxPlus program or to list a binary/tokenized PxPlus program, use one of the following methods:
Click the PxPlus icon in the top right corner of an Edit window and select Compile or List. This will allow you to select a folder (or folders) to perform the operation on the contents.
Click the PxPlus > Compile or the PxPlus > List menu item from the Explorer right click menu. This will take the current selection of file and folders in the Explorer and perform the operation on the contents.
Any PxPlus programs or text-based PxPlus programs that are selected or in the selected directories (or their sub-directories) will be compiled or listed.
(Support for compiling or listing PxPlus programs was added in PxPlus 2026.)
Use Code Navigation
To navigate to different sections within a PxPlus program, use one of the following methods:
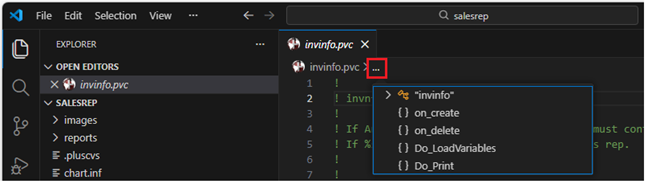
Use the breadcrumb menu at the top of the editor tab. Click the ... (ellipsis) to display a list of possible selections.
Select the OUTLINE section in the Explorer view to display a list of possible selections.
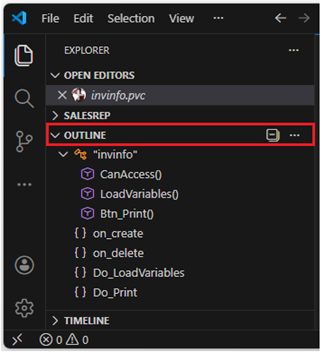
The list includes all labels, functions, classes and methods defined in the program. Select an item in the list to jump to its location in the code.
(Support for code navigation was added in PxPlus 2026.)
Compare Binary Programs
To compare binary programs:
1. | Open a binary PxPlus program in the editor. |
2. | Right click anywhere in the editor. |
3. | Select the PxPlus sub-menu. Select the Compare Programs option. |
4. | The PxPlus Program Compare Utility is launched. |
(Support for comparing binary programs was added in PxPlus 2026.)
View Properties for Binary Programs
To view binary program properties:
1. | Open a binary PxPlus program in the editor. |
2. | Right click anywhere in the editor. |
3. | Select the PxPlus sub-menu. Select the Program Properties option. |
4. | The PxPlus Program Properties Utility is launched. |
(Support for viewing binary program properties was added in PxPlus 2026.)
Auto Complete
When a PxPlus program is open and you begin typing, Auto Complete displays suggestions for all PxPlus language components (directives, mnemonics, system functions, system parameters, system variables) and the current document.
Click the arrow to the far right of a suggestion to expand it and view its description. To manually trigger Auto Complete, press Ctrl + Spacebar.
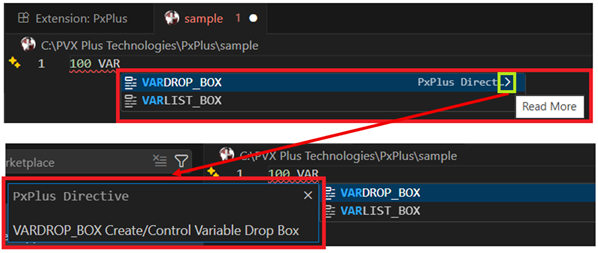
(Support for Auto Complete based on PxPlus Language elements was added in PxPlus 2026.)
PxPlus Extension Settings
The PxPlus extension settings are described below, grouped by category: PxPlus, WindX, WindX-SSH, Conversion and Language Preferences.
PxPlus
Setting | Description |
|---|---|
Pxplus Path | Enter the path to the directory containing the activated PxPlus or WindX Plug-in, excluding the filename. Example: C:\PVX Plus Technologies\PxPlus-64 2026 |
Text Program File Extensions | Specify which file extensions Visual Studio Code should recognize as text-based PxPlus programs. (Default: .pxprg) To add a new extension, click the Add Item button. To edit an existing extension, click the Pencil button beside the item. To delete an extension, click the X button beside the item. |
Maximum Number Of Problems | Controls the maximum number of problems reported for PxPlus programs. (Default: 100) |
WindX
Setting | Description |
|---|---|
Using Windx | Specify the WindX connection type. Available selections are No, Simple CS, NThost, SSH. (Default: No) |
Server | Specify the IP address or hostname of the WindX host (ignored if Using Windx is set to No). |
Port | Specify the port of the WindX host (ignored if Using Windx is set to No). |
Secure | Specify whether WindX host is using SSL/TLS (ignored if Using Windx is set to No or SSH). (Default: Off) |
WindX-SSH
Setting | Description |
|---|---|
User | Specify the operating system login username of the WindX host (ignored unless Using Windx is set to SSH). |
Password | Securely manage the operating system login password of the WindX host (ignored unless Using Windx is set to SSH). Click Set password to save an SSH password securely. Click Clear password to remove a saved SSH password. |
Pxplus Path | Specify full remote path to the PxPlus executable on the WindX host, including the filename (ignored unless Using Windx is set to SSH). Example: /home/user/pxplus2026/pxplus |
Conversion
| Setting | Description |
|---|---|
| Compiled Output Directory | Specify the path where compiled programs are created. |
| Compiled File Extension | Specify the file extension used for compiled programs. |
| Listed Output Directory | Specify the path where listed programs are created. |
| Listed File Extension | Specify the file extension used for listed programs. |
Language Preferences
| Setting | Description |
|---|---|
| Lowercase Directives | Displays the code with lowercase directives. (Default: Off) |
| Lowercase Variables | Displays the code with lowercase variables. (Default: Off) |
| Mixed Case Variables | Displays the code with mixed case variables. (Default: On) |
| Suppress LET | Displays the code without LET directives. (Default: Off) |