Using the TinyMCE HTML Editor
To add an HTML Editor to your application panel, follow these steps to create an External Control using the NOMADS Panel Designer:
1. | Select External Control from the Controls tool bar. Click and drag the mouse to outline the location of the TinyMCE® Editor control on the panel. |
2. | When the mouse is released, the External Control Properties window displays. Enter an Object Name for the control (e.g. ED). |
3. | Click the Ext. Control query button and select PVX Plus Controls from the pop-up menu. |
4. | From the list of PVX Plus Controls that displays, select Tinymce® Editor Control. |
5. | In the External Control Properties window, click the Properties tab to set the properties. See the Editor Properties and Editor Methods that are specific to the TinyMCE® HTML Editor. |
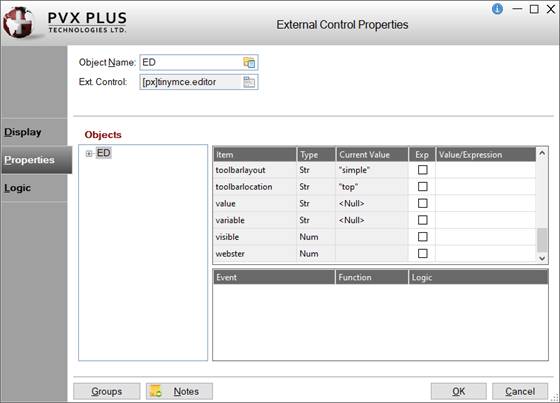 |
These properties, as well as other read-only properties utilized by NOMADS/iNomads, are used when creating the control and cannot be changed dynamically. The only dynamic property is the value$ property, which can be used to load and retrieve the contents of the Editor.
Example:
In this example, a Load button and a Save button will be added to the panel. The Load button invokes the GET_FILE_BOX dialog to specify an HTML file to load into the Editor. The OnChange logic looks like this:
get_file_box read p$,lwd,""
if p$<>"" then open(hfn,isz=-1)p$;
read record (lfo,siz=1000000) r$;
ed.ctl'value$=r$;
close(lfo)When a file name is selected, it is opened and the contents are read into a string variable, which is then assigned to the value$ property of the control. This loads the contents of the file into the Editor.
The Save button retrieves the contents of the Editor control via the Editor's value$ property and writes them to a local file, then displays them in the default browser. The OnChange logic looks like this:
x$=ed.ctl'value$
serial "[lcl]htmltest.htm",err=*proceed
open purge(hfn)"[lcl]htmltest.htm"
print(lfo)x$
close(lfo)
system_help "htmltest.htm"Editor Properties
The following properties (on the Properties tab in the External Control Properties window) are specific to the TinyMCE® HTML Editor:
Property | Description |
|---|---|
allowScripts | Use this property to allow editing of HTML with JavaScript. If set to 1 (On), JavaScript elements and properties are not stripped, thus allowing HTML with scripts to be edited. When set to 0 (Off), JavaScript elements and properties are stripped from edited HTML (default is 0). (The allowScripts property was added in PxPlus 2021 Update 2.) |
toolbarAlign$ | Alignment of the edit controls within the tool bar area. Options are Left (default), Center, Right. |
toolbarLayout$ | Selection of edit controls. The following pre-defined editing layouts are included: Modern, Narrow, Simple (default), Advanced, Extended and Fullpage. You can also create your own Custom Layout. To change the layout, enter the desired layout in the Value/Expression column (e.g. Modern). (The Modern and Narrow layouts are available as of PxPlus 2019.) |
toolbarLocation$ | Location of the tool bar containing the edit controls. Options are Top (default), Bottom, External. The External option displays the tool bar above the control when the control has focus and is available in iNomads only. |
value$ | Use this property to load and retrieve the contents of the Editor control. The control may be loaded with HTML code or plain text. |
webster | Use this property to enable the Webster+ menu items and tool bar button (default is 0). See Webster+. Setting this property to 1 allows the Modern Layout to be used, which already includes the Webster+ items. Alternatively, you can create/modify a layout with the keywords webster and websterpreview in the menu and tool bar sections of the layout. (The webster property was added in PxPlus 2021.) |
Editor Methods
The following method is supported:
| Method | Description |
|---|---|
| Focus( ) | Sets focus to the TinyMCE® Editor control. (The Focus( ) method was added in PxPlus 2021.) |
Modern Layout
The Modern layout uses menus and tool bar buttons. All Editor features can be found in the menu. The most common of those features are available as tool bar buttons.
This layout also uses the Fullpage option. With this option, the output from the Editor includes the <html> and <body> elements to produce a full page whereas the default excludes these portions. This option also adds a Metadata and document properties item on the Document menu, which is used to edit the different settings for the document, such as title, metadata, etc.

The menu, tool bar and right click menu options that are available with this layout are listed below.
Menu Options
The menu consists of the following options (in the order of appearance):
Document
Print
Metadata and document properties
Word count
Edit
Undo
Redo
Cut
Copy
Paste
Paste as text
Select all
Find and replace
Insert
Link
Remove link
Image
Media
Special character
Date/time
• hh:mm:ss
• yyyy-mm-dd
• hh:mm:ss AM/PM
• mm/dd/yyyy
Emoticons
Horizontal line
Nonbreaking space
Page break
Anchor
Webster Shortcodes (Available if the webster property is set to 1 - see Webster+ Short Codes)
View
Visual aids
Show invisible characters
Show blocks
Preview
Webster Preview (Available if the webster property is set to 1)
Format
Bold
Italic
Underline
Strikethrough
Superscript
Subscript
Bullet list
Numbered list
Decrease indent
Increase indent
Formats
• Headings
• Heading 1
• Heading 2
• Heading 3
• Heading 4
• Heading 5
• Heading 6
• Inline
• Bold
• Italic
• Underline
• Strikethrough
• Superscript
• Subscript
• Code
• Blocks
• Paragraph
• Blockquote
• Div
• Pre
• Align
• Left
• Center
• Right
• Justify
Clear formatting
Table
Table
• Displays a 2D grid for selecting the number of rows and columns desired for the new table
Table properties
Delete table
Cell
• Cell properties
• Merge cells
• Split cell
Row
• Insert row before
• Insert row after
• Delete row
• Row properties
• Cut row
• Copy row
• Paste row before
• Paste row after
Column
• Insert column before
• Insert column after
• Delete column
• Cut column
• Copy column
• Paste column before
• Paste column after
Help
Help
Tool Bar Options
The tool bar consists of the following (in the order of appearance):
Line 1: Undo | Line 2: Bullet list | Line 3: Webster Shortcodes (Available if the webster property is set to 1 - see Webster+ Short Codes) |
Right Click Menu Options
The right click menu is context sensitive and provides options that are specific to the selected object. For example, right clicking on a table displays table-related options, or right clicking on an image displays image-related options.
(The Modern layout is available with PxPlus 2019.)
Narrow Layout
The Narrow layout uses menus and tool bar buttons. A simplified set of Editor features can be found in the menu, and the most common of those features are available as tool bar buttons.

The menu, tool bar and right click menu options that are available with this layout are listed below.
Menu Options
The menu consists of the following (in the order of appearance):
File
New document
Print
Word count
Edit
Undo
Redo
Cut
Copy
Paste
Paste as text
Select all
Find and replace
Insert
Link
Remove link
Image
Media
Special character
Date/time
• hh:mm:ss
• yyyy-mm-dd
• hh:mm:ss AM/PM
• mm/dd/yyyy
Emoticons
Horizontal line
Nonbreaking space
Page break
Anchor
View
Visual aids
Show invisible characters
Show blocks
Preview
Format
Bold
Italic
Underline
Strikethrough
Superscript
Subscript
Bullet list
Numbered list
Decrease indent
Increase indent
Formats
• Headings
• Heading 1
• Heading 2
• Heading 3
• Heading 4
• Heading 5
• Heading 6
• Inline
• Bold
• Italic
• Underline
• Strikethrough
• Superscript
• Subscript
• Code
• Blocks
• Paragraph
• Blockquote
• Div
• Pre
• Align
• Left
• Center
• Right
• Justify
Clear formatting
Table
Table
• Displays a 2D grid for selecting the number of rows and columns desired for the new table
Table properties
Delete table
Cell
• Cell properties
• Merge cells
• Split cell
Row
• Insert row before
• Insert row after
• Delete row
• Row properties
• Cut row
• Copy row
• Paste row before
• Paste row after
Column
• Insert column before
• Insert column after
• Delete column
• Cut column
• Copy column
• Paste column before
• Paste column after
Tool Bar Options
The tool bar consists of the following (in the order of appearance):
New document
Bold
Italic
Underline
Align left
Align center
Align right
Font types
Font sizes
Source code
Right Click Menu Options
The right click menu is context sensitive and provides options that are specific to the selected object. For example, right clicking on a table displays table-related options, or right clicking on an image displays image-related options.
(The Narrow layout is available with PxPlus 2019.)
Simple Layout
The Simple layout consists of font-related and alignment options in a simple tool bar.

The tool bar and right click menu options that are available with this layout are listed below.
Tool Bar Options
The tool bar consists of the following (in the order of appearance):
Bold
Italic
Underline
Strikethrough
Align left
Align center
Align right
Font types
Font sizes
Source code
Right Click Menu Options
The Simple layout does not define a custom right click menu but rather a right click menu for the embedded browser.
Advanced Layout
The Advanced layout provides additional formatting features, such as Undo, Links, Images, Colors, etc.

The tool bar and right click menu options that are available with this layout are listed below.
Tool Bar Options
The tool bar consists of the following (in the order of appearance):
Line 1: New document | Line 2: Font types | Line 3: Align left |
Right Click Menu Options
The right click menu is context sensitive and provides options that are specific to the selected object. For example, right clicking on a link displays link-related options, or right clicking on an image displays image-related options.
Extended Layout
The Extended layout provides options for inserting date/time and adding a table.

The tool bar and right click menu options that are available with this layout are listed below.
Tool Bar Options
The tool bar consists of the following (in the order of appearance):
Line 1: New document | Line 2: Paragraph | Line 3: Clear formatting |
Right Click Menu Options
The right click menu is context sensitive and provides options that are specific to the selected object. For example, right clicking on a link displays link-related options, or right clicking on an image displays image-related options.
Fullpage Layout
The Fullpage layout is the same as the Extended layout and uses the Fullpage option. With this option, the output from the Editor includes the <html> and <body> elements to produce a full page whereas the default excludes these portions. This option also adds a Metadata and document properties tool bar button, which is used to edit the different settings for the document, such as title, metadata, etc.

Spell Checking
All of the layouts support automatic spell checking where incorrect words are red underlined. To see a list of suggested words and possibly replace the incorrect word with the correct one, hold down the Ctrl key and right click on the incorrect word.
See Also
Creating a Tool Bar Layout
Webster+
TinyMCE® is a registered trademark of Tiny Technologies Inc.