WindX Connection Manager
The WindX Connection Manager utility is designed to assist users who have multiple thin-client connections to multiple hosts. It provides users with the ability to define and save connection information in a control file, which can be recalled later to simplify connection.
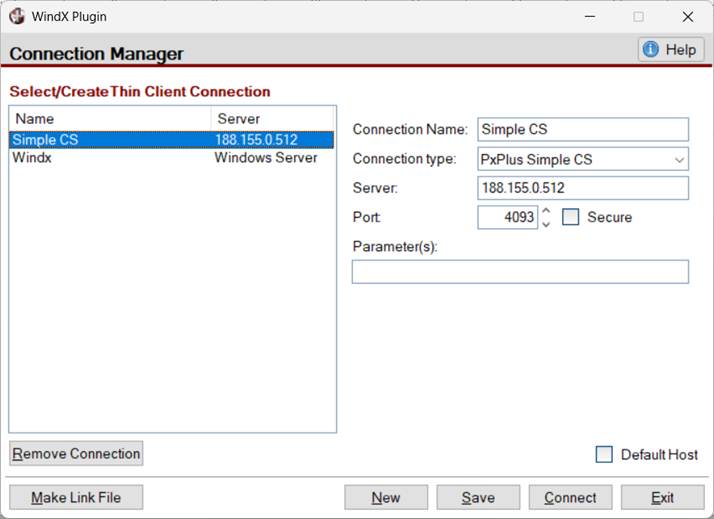
To invoke the Connection Manager, use one of the following methods:
Location | Method |
|---|---|
From the PxPlus IDE Main Launcher | Expand the Client Server category and select Launch Workstation. |
From the Windows Start menu | Locate WindX Plugin and select Client Launcher. |
From the PxPlus Command line or a program | Run the "launcher" program found in the WindX directory. |
Connection Settings
Each connection can have the following information:
Connection Name | Name that is entered to identify the connection. |
Connection type | Type of host, which can be one of the following: PxPlus Simple Client Server, SSH, Application Server, NThost/NTslave or Telnet. |
Server | This is generally the IP address and/or host name. |
Port | Connection port, which can vary based on the Connection type. By default, Port 4093 is used by the Simple Client Server, Port 10000 for NThost or the Application Server, or Port 23 for Telnet. |
Secure | The Simple Client Server, Application Server and NThost/NTslave support SSL and allow this option to be selected, if needed. |
Reset WindX/CS Security | This button (located in the upper right corner of the WindX launcher) is used to reset the WindX/CS security settings. If selected, a prompt asking to confirm the security reset will display. (The Reset WindX/CS Security button was added in PxPlus 2019.) |
Parameter(s) | For additional connection parameters that can be specified, see Parameters. |
Default Host | Check box that is used to define the connection as the default. |
The
buttons are described below.
New | Clears the fields (except Connection type and Port) for the currently selected connection (settings are not deleted) to make it easier to enter the settings for a new connection. The Port resets to the default for the selected Connection type; all other fields are cleared. (The New button was added in PxPlus 2026 Update 1.) |
Save | Saves the connection settings and adds the saved connection to the list on the left. |
Connect | Connects to the server. |
Exit | Closes the WindX Connection Manager with no further action taken. |
Remove Connection | Deletes the selected connection. Prior to deleting, a confirmation message is displayed. (The Remove Connection button was added in PxPlus 2026 Update 1.) |
Make Link File | Creates a link file with the extension .windx, which is used as a shortcut for starting the connection in the directory in which this file is located. See PxPlus Link File Extensions. (The Make Link File button was added in PxPlus 2017.) |
For information on managing connections, see Saving, Recalling and Removing a Connection.
For information on COM port and Telnet configurations, see WindX Configuration.
Saving, Recalling and Removing a Connection
Connections can be named and saved to the <install dir>/windx/connections.dat data file. If desired, a "default" connection can be defined. If a default is present when the Connection Manager is run, the settings for the connection marked as Default will be automatically loaded.
Creating and Saving a New Connection
To create a new connection when settings for an existing connection are currently displayed, click the New button to clear the fields. Enter the desired Connection Name, Connection type, and Server name, and adjust the Port if needed. When done, click the Save button.
The new connection is added to the list of saved connections on the left.
Recalling and Starting a Saved Connection
Select a connection from the list of saved connections on the left. The settings for the selected connection are displayed on the right. Click the Connect button to connect to the server.
You can also double click a saved connection to immediately load its settings and connect to the server.
To simplify connections, the Make Link File button can be used to create .windx link files as shortcuts.
Removing a Saved Connection
Select the connection you want to remove from the list of saved connections on the left. Click the Remove Connection button, or right click the connection and choose Remove connection from the popup menu. A message is displayed, prompting you to confirm the removal of the connection.
Parameters
The PxPlus Simple Client Server, NThost and the Application Server allow additional connection parameters to be specified:
Simple Client Server | Name of program to run | |
NThost | Name of program to run | |
Application Server | Name of 'process' to run |
To run an
SSH connection, five additional parameters can be specified, as shown in the example below:
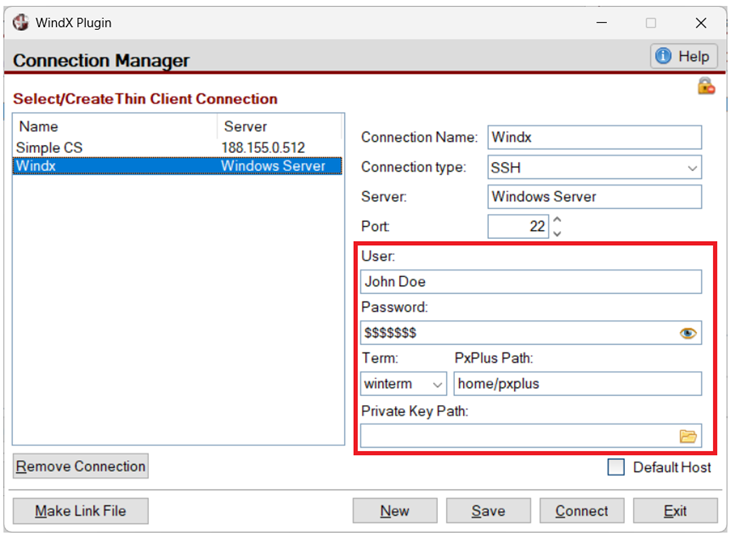
The parameters for an SSH connection are:
User | Username and/or Password to connect with. |
Term | Enter a terminal type or click the drop-down arrow to select one from the list: winterm, xterm or ansi. (The Term field was added in PxPlus 2025.) |
PxPlus Path | Enter the path to the directory where the PxPlus executable is located. (The PxPlus Path field was added in PxPlus 2025.) |
Private Key Path | Enter the path to a PuTTY private key (.ppk) file to use for SSH authentication or click the Query button (yellow folder) to specify the path. The PuTTY private key file contains the private half of an SSH key pair that PuTTY uses to authenticate you when connecting to an SSH server. It can be generated or converted using PuTTYgen (the PuTTY Key Generator utility). (The Private Key Path field was added in PxPlus 2026 Update 1.) |
Browser Launching
A Web shortcut can be provided for users who are connecting via Simple Client Server or SSH:
Example:
For Simple Client Server | windx://server:scs/4093/program | |
For SSH | windx://192.168.1.117:ssh/ |
Windows shortcuts (.url files) can be created, which users can put on the desktop.
See Launching WindX from a Browser.