Security Manager
NOMADS incorporates an optional security system that uses security classifications to identify users and control access to the system. For example, panel controls can be set up to allow full access, view-only access, or no access based on a user's security classification.
For added security, PxPlus provides the option to set up Two-Factor Authentication (2FA), which requires users to verify their identity using a second authentication method - such as email, text message, or an authenticator app - in addition to their user ID and password when logging in.
See How To Tutorials for Two-Factor Authentication (2FA).
(The option to set up Two-Factor Authentication was added in PxPlus 2023.)
(The ability to integrate with a third-party authenticator app was added in PxPlus 2026.)
Security Set Up
The security system is maintained through the Security category in the PxPlus IDE Main Launcher (Windows) or the PxPlus Web IDE, or by selecting the Security menu in the NOMADS Session Manager.
To set up security, two key components must be defined:
Classifications | In Security Class Maintenance, define the security classifications used by your system (e.g. ADMIN, SALES and MANAGER). |
Users | In User Maintenance, create User IDs and assign one or more security classifications to each user defined. Users with the ADMIN classification can also set up Two-Factor Authentication (2FA), if desired. |
Once classifications and users have been defined, you can restrict or allow access to specific objects by using Object Security Definition.
In addition, Webster+ System Security provides an option to use the NOMADS security files.
How the System Works
By default, no security classifications are assigned; therefore, there is no security and all users are granted full access. When you assign security classifications to specific objects, only users belonging to the assigned classifications are allowed access. For example, a panel control will not be displayed to users who do not belong to the assigned classification.
For information on defining object security and the various locations where security can be applied, see Restricting Access.
Two-Factor Authentication (2FA)
PxPlus provides the option to set up Two-Factor Authentication to enhance system security. When Two-Factor Authentication is set up, users logging in must verify their identity by entering a randomly generated six-digit security code received by email or SMS text message, or obtained from an authenticator app.
(The option to set up Two-Factor Authentication was added in PxPlus 2023.)
(The ability to integrate with a third-party authenticator app was added in PxPlus 2026.)
The primary purpose of Two-Factor Authentication is to help ensure user identity by requiring both something the user knows (user ID and password) and something the user has access to (email account, device for text messages, or an authenticator app).
Setting Up Two-Factor Authentication
Two-Factor Authentication can be set up using email, SMS text messaging, and/or an authenticator app. Based on the methods selected, the system administrator must set up the required services within the system. Users must then provide the necessary information for the chosen authentication methods, such as a verified email address, an SMS-compatible phone number, or a registered authenticator app. This information is used to verify the user's identity during login.
If only one authentication method is specified, that method will be used automatically. If more than one authentication method is specified (email, SMS, authenticator app), the user can choose the method to use for verification at login.
Once Two-Factor Authentication is obtained, it can be saved on the device used for a period of time, thereby allowing the users to defer from having to re-verify their identity every time they log in from the same device.
For example, a user might be working on a desktop computer in a secure office environment, in which case the system administrator may feel that requiring authentication at every logon may be burdensome. In such cases, the administrator can set the system so that authentications remain active for a number of days or maybe for a month.
System administrators can access the Two-Factor Authentication settings through User Maintenance, which is launched from the IDE Main Launcher or NOMADS Security menu. When User Maintenance is run using an ADMIN account, a button is available to access the Two-Factor Authentication settings. When User Maintenance is run using a non-ADMIN account, only the current user's information can be modified.
Two-Factor Authentication also allows end users to confirm their identity if they forget their password. During system logon, if a user enters an incorrect password and has a valid email address, SMS phone number or authenticator app on file, the system will display a Forgot Password option. Selecting this option allows the system to re-authenticate the user for the purpose of resetting his/her password.
See Two-Factor Authentication Setup.
Login Process with Two-Factor Authentication
This table outlines the key steps for logging in using Two-Factor Authentication:
1. | Enter Credentials The user enters his/her User ID and Password in the Sign on window. 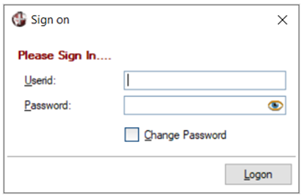 |
2. | Select Authentication Method (if applicable) If more than one authentication method is specified for the user in User Maintenance, the Device Authentication Required window displays, showing the authentication methods enabled for that user. The user then selects the method to use for verification. If only one authentication method is specified in User Maintenance, then the Two-Factor Verification window (see Step 4) displays that method automatically. 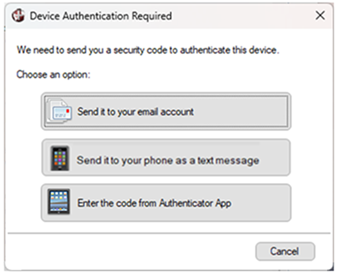 |
3. | Receive or Obtain Security Code The user receives a randomly generated six-digit verification code by email or SMS text message, or obtains a six-digit code from the authenticator app. |
4. | Enter and Verify the Security Code The Two-Factor Verification window displays. The user enters the six-digit security code and selects Verify. Example: This Two-Factor Verification window is for an email verification: 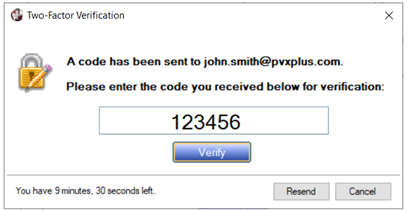 |
5. | Complete Sign-In If the security code is valid, authentication is successful, and the user is granted access. If the security code is invalid or expired, the user must enter a valid code. For email or SMS text message verification, request a new code by selecting Resend. For authenticator app verification, obtain a new code from the authenticator app. |
OAuth2 Web Service Security
OAuth2 security can be added to restrict access to PxPlus Web services.
First, OAuth2 clients must be defined using either OAuth2 Client Maintenance or the OAuth2 Clients Object.
Next, access is restricted either via NOMADS security on a query or report, or by security enabled in Web Services Maintenance.
For information on accessing restricted PxPlus Web services, see Access OAuth2 Restricted Web Service.
(OAuth2 security was added in PxPlus 2021.)
See Also
*SECURE Security Control
Security Sign On
User Maintenance
Two-Factor Authentication Setup
How To Tutorials for Two-Factor Authentication (2FA)