The Menu Link feature is used to incorporate an existing menu as part of another menu bar or popup menu, which provides several advantages:
A set of standard menus could be stored (and maintained) together in a library of their own for reusability - deploy these on your menu via Menu Link.
If you implement NOMADS Security, you can simply omit the menu from the library where a user should be restricted from viewing it - a link to a menu that does not exist on the system does not error.
You may want to reuse menus that appear in another library.
The link can be to a Popup Menu or to a panel containing a Menu Bar definition.
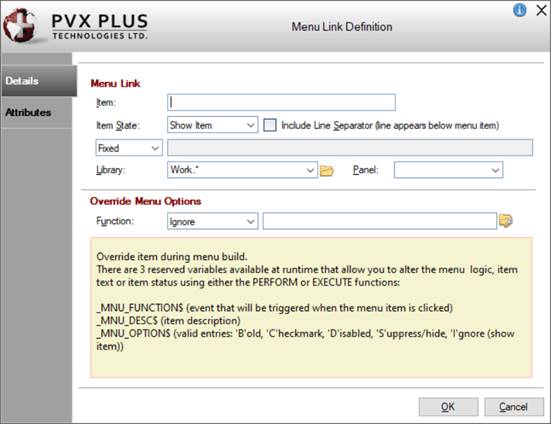
Menu Link Definition
In the Menu Bar Definition dialogue, click the Menu Link button to invoke Menu Link Definition.
This dialogue is divided into two tabbed panels for defining the properties of a menu link: Details and Attributes.
Details
Menu Link
Item
Item name. A prefixed ampersand is mandatory.
Item State
Initial state of the menu item at run time. Click the drop-down arrow for a list of selections:
Show Item
Displays the item text as listed.
Suppress Item
Removes the item from the menu bar.
Disable Item
Displays the item but functionality is disabled.
Fixed or Expression
Fixed
Apply Library, Panel values listed in fields below.
Expression
Apply string variable or expression.
Library
If Fixed is selected, this field shows the current library. Click the Browse button to change libraries.
Panel
Click the drop-down arrow to select a popup menu or panel object from the list.
Override Menu Options
Function
Override logic to be executed on menu build. Click the drop-down arrow for a list of selections:
Ignore
No logic to be performed. (Default)
Perform
Perform a program.
Execute
Execute a series of statements separated by semi-colons.
Click the Program Logic button beside the Perform action to launch the default program editor, which is typically the *IT - Integrated Toolkit. To make Ed+ the default program editor, change the setting for the %NOMADS'Program_Editor property to Ed+.
(The ability to set Ed+ as the default program editor was added in PxPlus 2023.)
Attributes
Bitmaps
Normal
Assign a bitmap that will appear to the left of the text when the menu is drawn. Can be a Fixed value or string Expression. Click the Bitmap Library button to select a bitmap. If specifying an external image, see Note below.
Checked
Assign a bitmap that will appear to the left of the text when the menu is drawn. Can be a Fixed value or string Expression. Click the Bitmap Library button to select a bitmap. If specifying an external image, see Note below.
Bitmap/Image transparency options can also be applied to internal and external images:
T
Use upper leftmost pixel color.
G
Use Light Gray color RGB: 192,192,192.
N
No transparency. (Allows override for "!" bitmaps, which always imply Light Gray transparency.)
(The ability to enter an expression for a bitmap was added in PxPlus 2019.)
Text Background Color
Assign a text background color. Click the drop-down arrow for a list of selections:
Menu Default
Indicates use of the default color settings for the entire menu.